Toolless lazy loading and micro-frontends (part 1)
In the last part, I finished the styling of the major sections on the weather information page and was getting ready to move on to the JavaScript. While working on it, however, I had a conversation that suggests some people need assurances that vanilla can scale before they consider learning it, and that made me reconsider the course of action a bit. Therefore I promised I'd talk about splitting the page into multiple units.
The reason I decided to deviate from the previous plan and address this now is the question of vanilla apps and their ability to scale. When scaling applications you need to address different challenges: performance, complexity, collaboration, number of support targets, and user base growth. Modularization addresses the following aspects: performance, complexity and collaboration. Various ways to split the code and strategies for loading assets exist that address the loading performance, for instance. We can also split the application up into smaller self-contained units that are composed to form the whole system. Finally, we can split the code to allows teams to work on different parts of the application simultaneously.
In my experience, vanilla apps don't really suffer from the performance degradation that necessitates code splitting to address performance. Therefore, in the context of vanilla development, modularization is primarily used to address complexity and collaboration.
Even in vanilla projects, using an asset bundler allows you to use the typical approach to modularization that you'd use in any front end project. However, this series of article focuses on build-less development. This means that we cannot infinitely modularize the codebase because we don't use tools that can combine them back together, and we are going to favor a smaller number of larger units compared to a typical front end project. Luckily this also means less moving parts.
Although I've already talked about the MPA architecture, which effectively splits applications into self-contained contexts, in this part, I'm going to talk about dividing the pages themselves into units, and lazy-loading the units at runtime. This approach directly addresses both the complexity and collaboration challenges at the same time, providing a strong framework for scaling vanilla apps.
The why
As I've already mentioned in the part 2, the MPA pattern allows us to scale the apps reasonably well, with well-defined contexts that map naturally to physical pages, and fully leveraging the browser's native behaviors for navigation, as well as the latest APIs to engaging transitions.
The MPA architecture does have technical drawbacks. For instance, in the
build-less context, it doesn't offer native mechanisms for sharing HTML between
pages apart for the resource-intensive <iframe>. Persisting state between
pages requires us to store data ina serialized form either in the browser's
native storage or in a backend. And so on.
The biggest challenge with MPAs for large applications, though, is that it determines the boundaries from UX perspective only. Although this addresses complexity challenges to an extent, it is not a complete solution for that, nor does it address the need for multiple teams to work on the same page. In most cases this isn't a big issue, but depending on the team and the concentration of features in a single page, there may be cases where finer-grain modularization is needed.
The design
I'm going to use a custom element as a component placeholder. Something like this:
<x-placeholder for="weather-summary"></x-placeholder>When mounted, this loader element will load ./weather-summary.js,
./weather-summary.css and ./weather-summary.html, and insert the HTML into
its subtree. The expectation is that the JavaScript will register a custom
element that will activate the element(s) in the HTML.
Nice and simple. This is it as far as the loader goes. It should suffice for the purpose fo this app, and off the top of my head, I don't expect there to be a need for anything else.
Incidentally, this method of lazy-loading is compatible with any browser supporting custom elements, and can be used not just to load vanilla code, but also code using frameworks. This can be, therefore be used to facilitate a micro-frontend architecture.
Since the assets are loaded using parallel requests, having tons of these units is not going to work very well. It's best used for larger chunks of UI in smaller numbers. I can't give you numbers off the top of my head, but I wouldn't go over 3 or 4 due to limitations on the number of parallel connections browsers can make.
This example doesn't incorporate much error handling to keep things concise. Keep in mind that the more demanding versions may include things like retries, logging, and/or fallback UI.
Splitting out the components
The first thing I'm going to do is split out the components. Since I've already got the content segregated within the page using custom elements, this shouldn't be so hard.
I'm copying the <x-weather-summary> and everything inside it into a
weather-summary.html file. I put this file into the same folder as the rest of
the files. Next, I'm copying the declaration blocks in CSS that have a
x-weather-summary selector into a file weather-summary.css. Finally, I
create an empty JavaScript file, weather-summary.js.
It's the same story for the <x-weather-forecast>.
In the index.html file, where I had those two custom elements, I'm now
adding the following:
<x-placeholder for="weather-summary"></x-placeholder>
<x-placeholder for="weather-forecast"></x-placeholder>
When I reload the page, I see nothing. That's good. The loader does not exist yet, so I am expecting to see nothing.
The loader
On to the loader. The loader is going to live in the common.js file.
I'm first creating a new custom element x-placeholder.
customElements.define('x-placeholder', class extends CustomElement {
    setup() {
        // ....
    }
});
The code I'll be showing you in the remainder of this section is inside the
setup() method.
The first thing I need to get is the name of the component. Specifically, the basename of the three files – HTML, CSS and JavaScript for the component.
let basename = this.getAttribute('for')Let me briefly talk about something you don't see here. You don't see much validation or processing of the basename. The loader will malfunction if there's a typo in the attribute name or its value, a stray blank at the start or the end of the basename, wrong case, and similar. It would be nicer for me if there was some validation to indicate what went wrong. Right? However, to get that little bit of convenience, I'd adding code the user doesn't need for the UX – bloat in other words. We can't have that! If it doesn't concern the end user, it doesn't get shipped. The issues related to bad basename are mitigated trivially by just... you know... checking the dev tools and making sure there aren't any errors.
I'm loading the CSS next.
let cssLink = document.createElement('link')
cssLink.rel = 'stylesheet'
cssLink.media = 'screen'
cssLink.href = basename + '.css'
document.head.append(cssLink)
Hopefully this is easy enough to understand, if a bit verbose. I will touch on the code style a bit, though. There are different ways to do the same thing. Let me give you some examples:
// A. Using object assign to assign properties

document.head.append(Object.assign(
    document.createElement('link'),
    {
        rel: 'stylesheet',
        media: 'screen',
        href: basename + '.css',
    },
))

// B. Create the DOM nodes from a string

function render(html) {
    return Object.assign(
        document.createElement('div'),
        {innerHTML: html},
    ).firstElementChild
}

document.head.append(
    render(`<link rel="stylesheet" media="screen" href="${basename}.css">`)
)

// C. Some helper library like HyperScript

document.head.append(
    h('link', {rel: 'stylesheet', media: 'screen', href: basename + '.css'})
)
Some developers may prefer one of these alternatives, or have their own.
Before I explain why I didn't use any of the fancy ones (not even
Object.assign() which I think is a nice and clever trick), let me tell you a
story. One day, I was sharing with one of my mentees my thoughts on the
'vanilla' examples in the NextJS documentation – how they seemed intentionally
overcomplicated to make vanilla development look off-putting and reinforce the
idea that it's very hard and that's why you need frameworks. Then I showed the
mentee several ways the code could be 'improved' – or at least, that's what I
thought I was doing. The mentee, confused at first, eventually worked up the
courage to counter my enthusiasm with: "But I find the first version the easiest
to read."
I thought about this for a while, and here's my explanation. This is because it breaks the whole operation down to individual steps, and each step is easy to understand on its own. It doesn't require reading the whole thing once to understand how different parts relate to one another. With this insight, I also no longer mind the more verbose format. I typically save so much code elsewhere that a bit of verbosity here and there doesn't hurt much.
For JavaScript, I don't need to create any script tags or anything. I can simply do this:
import(`./${basename}.js`)That's it. This is called a dynamic import. It normally returns a Promise,
which resolves to the imported module object. In this case, I'm expecting
the module to be used only for its side-effects – the code that executes
when the module is loaded should do some work, like defining a custom element.
For HTML, I'm using this bit of code:
let http = new XMLHttpRequest()
http.open('GET', `${basename}.html`)
http.responseType = 'document'
http.onerror = () => {
   this.innerHTML = '<p>Failed to load the interface</p>'
}
http.onload = ev => {
   if (http.status == 200) this.append(...[...http.response.body.children])
   else this.innerHTML = '<p>Failed to load the interface</p>'
}
http.send()
If you're used to fetch(), your knee-jerk reaction may be that this looks
way too verbose. But you'll see in a bit that it's actually not.
If you're not familiar with the XMLHttpRequest API, I'll break it down for
you.
The XMLHttpRequest objects are event emitters. This is basically the same as
the Window object or any Element. You can say http.addEventListener('load', ....), if you prefer that. When you initiate the request, it will emit events
at various stages of the request-response cycle, and in this case, I'm using the
load and error events.
The important bit is the http.responseType = 'document'. This feature does not
exist in fetch(). When I set the response type to 'document', the browser
will treat the response as HTML or XML, parse it, and set the resulting DOM tree
as the result. Pretty neat eh?
Let me show you the fetch() version:
fetch(`${basename}.html`)
    .then(response => {
        if (response.ok) {
           return response.text()
        } else {
           throw new Error('Failed to load the interface')
        }
     })
     .then(html => {
        let doc = new DOMParser().parseFromString(html, 'text/html')
        this.append(...[...doc.body.children])
     })
     .catch(() => {
        this.innerHTML = '<p>Failed to load the interface</p>'
     })
Although the old-school API may look more verbose at first sight, it's actually
less verbose, and higher-level than the newer fetch() API (because it
abstracts the document parsing). If you fell for the "old == bad" trap, now's
your chance to reconsider.
As an aside, I keep saying XMLHttpRequest is "old", but the current version is
different from the 1999 Internet Explorer version. The current one was specified
by WHATWG in 2014, only one year before the Fetch API.
Branching off
For added realism, I'm branching off the master branch now. I'm going to do this for the other unit as well, as well as any shared code. If all goes well, I'm supposed to have no or minimal merge conflicts.
Place label
First thing first, I'm going to implement the place label. This is a "common" feature that isn't in any of the units. I could technically implement this as a separate unit but it would mean loading 3 additional files just to do this little thing. It makes no sense even in this pretend scenario.
In index.js, I'm adding the following:
import {CustomElement} from './common.js'

customElements.define('x-current-place', class extends CustomElement {
   setup() {
      let selectedLocation = JSON.parse(localStorage.selectedPlace ?? null)

      let placeName = this.querySelector('.place-name')

      if (selectedLocation) placeName.textContent = selectedLocation.name
      else location.replace('place.html')
   }
})
If there's a selected place in localStorage, then I update the label.
Otherwise, I redirect to place.html. The location.replace() method replaces
the current (non-functional) page with the place page in such a way that going
back in the history ignores this weather page. This improves UX in this case
because going back would otherwise cause the user to be immediately redirected
back to the place page and create an illusion of being stuck there if they're
coming from an external site.
Weather summary
Now that I've dealt with the common bit – on a separate branch – I can do the summary. In real life, this work would progress in parallel with the place label task.
The first challenge is the data. The data can be obtained using a single API call, but we have two units that are supposed to be developed independently. So how do we deal with it?
We could add caching at the application level, which involves adding a service worker. That's a lot of complexity, plus it introduces coupling between the two units, and requires a bit of coordination between the two teams. Ideally we want to keep the teams either completely isolated or with minimal coordination.
Second option is to make two calls and use parameters to limit the data to the data specific to each component. That makes sense, and it supports the idea of having two independent units. However, we need to make two requests where one would suffice.
I'm going with the second one as it's more in line of keeping the units independent and introduces less overall complexity.
Separately, I also need a timezone for the forecast data which currently isn't
available in the selected place object, so I'm going to have to address that in
the place page, in place.js:
localStorage.selectedPlace = JSON.stringify({
   name: button.place.name,
   lat: button.place.latitude,
   long: button.place.longitude,
   timezone: button.place.timezone, // <- added this
})
Next, I'm setting up the custom element for the weather summary. In the
weather-summary.js I add the following code:
customElements.define('x-weather-summary', class extends CustomElement {
   setup() {
      // ...
   }
})
The rest of the code will go into the setup method. In the first pass, I'll just set up the data-fetching code, and I'll leave the functions that handle the results blank for now.
let selectedPlace = JSON.parse(localStorage.selectedPlace || null),
lat = selectedPlace?.lat,
long = selectedPlace?.long,
timezone = selectedPlace?.timezone
let displayError = () => {},
displaySummary = data => {}
if (selectedPlace) {
let http = new XMLHttpRequest()
http.open('GET', `https://api.open-meteo.com/v1/forecast?latitude=${lat}&longitude=${long}&timezone=${encodeURIComponent(timezone)}¤t=temperature_2m,relative_humidity_2m,weather_code,surface_pressure,wind_speed_10m,wind_direction_10m&daily=temperature_2m_max,temperature_2m_min,precipitation_probability_max&forecast_days=1`)
http.responseType = 'json'
http.onerror = displayError
http.onload = () => {
if (http.status == 200) displaySummary(http.response)
else displayError()
}
http.send()
}I've named the lat, long, and timezone variables to match how I named them
earlier on the places.html page. I generally try to be consistent with these,
as it helps with maintenance – I want to build a reflex that when I see a name
lat, I know it's always a numeric value representing latitude, and not
something else.
I'm parsing the selected place the same way I did it for the place label. This bit of code is duplicated verbatim, and normally it would be good candidate for factoring out into a function as it totally breaks the single source of truth principle, but I'm ok with that right now because:
- It's not complex code.
- It's not very likely to change often because it's a contract between two pages, and therefore has the tendency to resist change.
YMMV.
The data-fetching code uses a hard-coded URL. Since I'm only changing the
latitude, longitude, and the timezone, based on the values in the
localStorage, I'm using a template literal to interpolate the information.
The disadvantage of this approach is that, if I later decide I need additional data from the API, I need to edit the string to get that patched in, and that means I have to mentally parse the URL every time. Not great.
Whether I will keep hard-coded values or not depends on my confidence that what the value represents won't change dramatically (if at all) once I'm done with the feature. In real life, this is informed partly by experience, partly by talking to stakeholders, clients, users. At any rate, if I'm confident, I will not resort to elaborate designs as that would be optimizing for temporary convenience rather than long-term maintainability. It's a judgement call, though. Confidence doesn't mean "accurate prediction".
I've separated out the two functions, one for handling the positive outcome,
displaySummary(), and one for handling the negative one, displayError().
These are just stubs that I'm going to work on next. Normally, my only criteria
for splitting out a function is code reuse. However, occasionally I'll make an
exception for clarity. Here, if I stick with my usual approach, I wouldn't have
a displaySummary(). However, since displayError() and displaySummary() are
symmetrical operations, having them next to each other makes the code easier to
understand, and possibly also change.
I'm going to flesh out the displaySummary() function first. I've got 7
tiles in total. Although it looks like they follow the same general pattern,
there are actually four patterns.
- Two tiles use the value as is using the current weather data.
- Minimum and maximum temperatures, and precipitation, are taken from a the daily forecast data.
- Current weather condition is two-part, where one part is an icon name.
- The wind is three-part, where one part is a custom CSS property and two are text labels.
Given the lack of a clear pattern, I'm going to avoid abstracting this for now. I'll write the code the "dumb" way first and see if something emerges. If it doesn't, it's fine. It's not a lot of code.
The weather icons need to be derived form the WMO weather codes.
The OpenMeteo uses a subset of those documented on their website, and the icons
are themselves a subset of the codes. This means multiple codes need to be
mapped to the same icons. There are several ways to do this, but I find switch
would be a reasonable choice.
let getWeatherId = code => {
   switch (code) {
      case 0:
         return 'sunny'
      case 1:
      case 2:
         return 'cloudy'
      case 3:
         return 'overcast'
      case 45:
      case 48:
         return 'fog'
      case 51:
      case 53:
      case 55:
      case 56:
      case 57:
         return 'drizzle'
      case 61:
      case 64:
      case 65:
      case 66:
      case 67:
         return 'rain'
      case 71:
      case 73:
      case 75:
      case 77:
         return 'snow'
      case 80:
      case 81:
      case 82:
         return 'rain'
      case 85:
      case 86:
         return 'snow'
      case 95:
      case 96:
      case 98:
         return 'thunderstorm'
      default:
         return 'x'
   }
}
Because the values are numeric, I could've come up with a more compact representation. Something like this:
let getWeatherId = code => {
   if (code == 0) return 'sunny'
   if (code <= 2) return 'cloudy'
   if (code <= 3) return 'overcast'
   if (code <= 48) return 'fog'
   // ....
   return 'x'
}
I decided against this for readability – switch makes the mapping more
explicit and obvious.
Now I can implement the weather condition and the current temperature. First I need to add the references to the relevant elements:
let currentTemperature = this.querySelector('.current-temperature dd span'),
    weatherConditionIcon = this.querySelector('.current-weather-condition')
I'm updating the displaySummary() to patch the data into the DOM:
 displaySummary = data => {
   console.log(data) // <-- handy reference in the console
   // Weather and current temperature
   weatherConditionIcon.name = getWeatherId(data.current.weather_code)
   currentTemperature.textContent = Math.round(data.current.temperature_2m) + data.current_units.temperature_2m
 }
Testing this, I realize that the icon isn't updating. This is because the
<x-icon> isn't fully fleshed-out yet.
- The
nameproperty doesn't actually exist on the<x-icon>elements (yet). - The element doesn't react to the updates in the name attribute yet.
To address this, I'm going to modify the custom element for the <x-icon>
element. First, let me add the name property.
customElements.define('x-icon', class extends CustomElement {
   get name() {
      return this.getAttribute('name')
   }

   set name(value) {
      this.setAttribute('name', value)
   }

   // ....
})
Having to spell out the getters and setters for each property gets old very quickly in larger apps, so I normally have abstractions for it. Right now, I'm skipping that.
Next, I need to mark the name attribute as observed so that I can react to
changes.
customElements.define('x-icon', class extends CustomElement {
   static observedAttributes = ['name']

   // ....
})
And to react to the attribute change, I do this:
customElements.define('x-icon', class extends CustomElement {
   // ....

   attributeChangedCallback() {
      this.querySelector('use')?.setAttribute('href', `icons.svg#${this.getAttribute('name')}`)
   }
})
When reacting to the change in the name attribute, I need to update the href
attribute of the <use /> element (it has the /> because it's SVG, which is
XML). Although the attributeChangedCallback() takes the attribute name as its
first value, I don't use that here as it's just one observed attribute.
Moving on the to the rest of the data.
let currentTemperature = this.querySelector('.current-temperature dd span'),
    weatherConditionIcon = this.querySelector('.current-weather-condition'),
    minTemperature = this.querySelector('.min-temperature dd'),
    maxTemperature = this.querySelector('.max-temperature dd'),
    precipitation = this.querySelector('.precipitation dd'),
    pressure = this.querySelector('.pressure dd'),
    humidity = this.querySelector('.humidity dd'),
    windSpeed = this.querySelector('.wind-speed'),
    windDirectionLabel = this.querySelector('.wind-direction-label'),
    windDirectionGraphic = this.querySelector('.wind-direction-graphic')

// ....

let COMPASS_DIRECTIONS = ['N', 'NNE', 'NE', 'ENE', 'E', 'ESE', 'SE', 'SSE', 'S', 'SSW', 'SW', 'WSW', 'W', 'WNW', 'NW', 'NNW']

let /* .... */
    getCompassDirection = degrees => COMPASS_DIRECTIONS[Math.round(degrees / 22.5) % 16],
    displaySummary = data => {
      // ....

      // Min/max temperature, precipitation
      minTemperature.textContent = Math.round(data.daily.temperature_2m_min [0]) + data.daily_units.temperature_2m_min
      maxTemperature.textContent = Math.round(data.daily.temperature_2m_max [0]) + data.daily_units.temperature_2m_max
      precipitation.textContent = data.daily.precipitation_probability_max[0] + data.daily_units.precipitation_probability_max
      // Pressure, humidity
      pressure.textContent = Math.round(data.current.surface_pressure) + data.current_units.surface_pressure
      humidity.textContent = Math.round(data.current.relative_humidity_2m) + data.current_units.relative_humidity_2m
      // Wind
      windSpeed.textContent = Math.round(data.current.wind_speed_10m) + data.current_units.wind_speed_10m
      windDirectionLabel.textContent = getCompassDirection(data.current.wind_direction_10m)
      windDirectionGraphic.style.setProperty('--direction', data.current.wind_direction_10m)
    }
I've defined a function that calculates the compass direction label from the degrees, and that's the most fun I'm getting out of it.
Now that I'm done with exploratory coding, I need to look back and see if I've learned anything useful.
One thing that surfaces is that whether a single tile has multiple slots to be filled in doesn't matter at all. I have to remind myself again that the whole pont of having content structure and behavior as separate layers is that I can sometimes ignore the content structure. Each individual part can be seen as a separate item. For instance, instead of seeing "Wind" as a single thing with 3 parts, I can look at it as three different things. That would help with coming up with a good abstraction.
There's one thing I really don't like, though, which is the way current weather and daily forecasts are different data types – primitive vs array, respectively. I'm not gonna go too deep into the thought process, but the final verdict is that the abstraction would be too complex to be actually useful – despite its potential benefits for maintainability, the drawback would be too big. Therefore, I'm leaving the code as is for now. I am going to show you what such an abstraction might look like, though.
let COMPASS_DIRECTIONS = ['N', 'NNE', 'NE', 'ENE', 'E', 'ESE', 'SE', 'SSE', 'S', 'SSW', 'SW', 'WSW', 'W', 'WNW', 'NW', 'NNW'],
        getDailyForecast = key => data => ({
           value: data.daily[key][0],
           unit: data.daily_units[key],
        }),
        getCurrentWeather = key => data => ({
           value: data.current[key],
           unit: data.current_units[key],
        }),
        toRawValue = ({value}) => value,
        toFormattedValue = ({value, unit}) => `${Math.round(value)}${unit}`,
        toWeatherId = ({value}) => {
            // .... the same code as getWeatherId
        },
        toCompassDirection = ({value}) => COMPASS_DIRECTIONS[Math.round(value / 22.5) % 16],
        setText = (element, value) => element.textContent = value,
        setName = (element, value) => element.name = value,
        setDirection = (element, value) => element.style.setProperty('--direction', value),
        makeSlot = (root, spec) => {
           let slotElement = root.querySelector(spec.selector)

           return data => {
              let value = spec.getValue(data)
              spec.update(slotElement, spec.transform(value))
           }
        },
        makeSlotList = (root, specList) => {
           let slots = specList.map(spec => makeSlot(root, spec))
           return data => slots.forEach(update => update(data))
        }
I've decompose all existing operations and defined them as separate functions.
I've normalized their behaviors so that functions that handle the same stage of
the operation has the identical signature and identical output format, as well
as the same naming pattern. For instance, functions that transform values to the
final version that should be applied to the UI have a to prefix in the name,
take an object that has value and unit properties, and are expected to
return a primitive value.
The slots are declared using spec objects. These look like so:
let updateSlots = makeSlotList(this, [
    {
        selector: '.current-temperature dd span',
        getValue: getCurrentWeather('temperature_2m'),
        transform: toFormattedValue,
        update: setText,
    },
    {
        selector: '.current-weather-condition',
        getValue: getCurrentWeather('weather_code'),
        transform: toWeatherId,
        update: setName,
    },
    {
        selector: '.min-temperature dd',
        getValue: getDailyForecast('temperature_2m_min'),
        transform: toFormattedValue,
        update: setText,
    },
    // ....
    {
        selector: '.wind-direction-graphic',
        getValue: getCurrentWeather('wind_direction_10m'),
        transform: toRawValue,
        update: setDirection,
    },
])
The makeSlotList() function returns a function that we can use to update
the slots. Thus we get this:
let displaySummary = updateSlotsYou might agree that the abstraction looks nice and tidy, but it's a lot more code, it's a lot more moving parts, and more complex to understand. I don't know about you, but I'm scrapping this.
Moving on to the error display. Here, things are simpler as we don't have to
insert the live data. I'm copying the code from the displaySummary(), and
tweaking it. This keeps the symmetry between the two functions obvious.
I was initially thinking of finding some unicode character that would represent "value not available" type of situation. However, this won't be clear to screen reader users, so I decided to add the following into the HTML:
<x-weather-summary>
   <!-- .... -->

   <template data-name="no-value">
        <span class="no-value">
            <x-icon name="disconnected"></x-icon>
            <span class="alt-text">Not available</span>
        </span>
   </template>
</x-weather-summary>
This snippet will play the role of a value placeholder. When the role of a
template isn't quite obvious or I use multiple templates within a single
custom element, I give them a data-name attribute which I can use to
identify them.
I'm also adding an icon that represents the network error.
noValue = this.querySelector('template[data-name="no-value"]').content

displayError = () => {
   // Weather and current temperature
   weatherConditionIcon.name = 'disconnected'
   currentTemperature.replaceChildren()
   // Min/max temperature, precipitation
   minTemperature.replaceChildren(noValue.cloneNode(true))
   maxTemperature.replaceChildren(noValue.cloneNode(true))
   precipitation.replaceChildren(noValue.cloneNode(true))
   // Pressure, humidity
   pressure.replaceChildren(noValue.cloneNode(true))
   humidity.replaceChildren(noValue.cloneNode(true))
   // Wind
   windSpeed.replaceChildren(noValue.cloneNode(true))
   windDirectionLabel.replaceChildren()
   windDirectionGraphic.style.setProperty('--direction', 0)
}
To test this, I'm temporarily blocking the Open Meteo URL in dev tools. To do this, all I need to do is go into the Network tab, find the request, right-click it, and from the context menu, select "Block request URL".

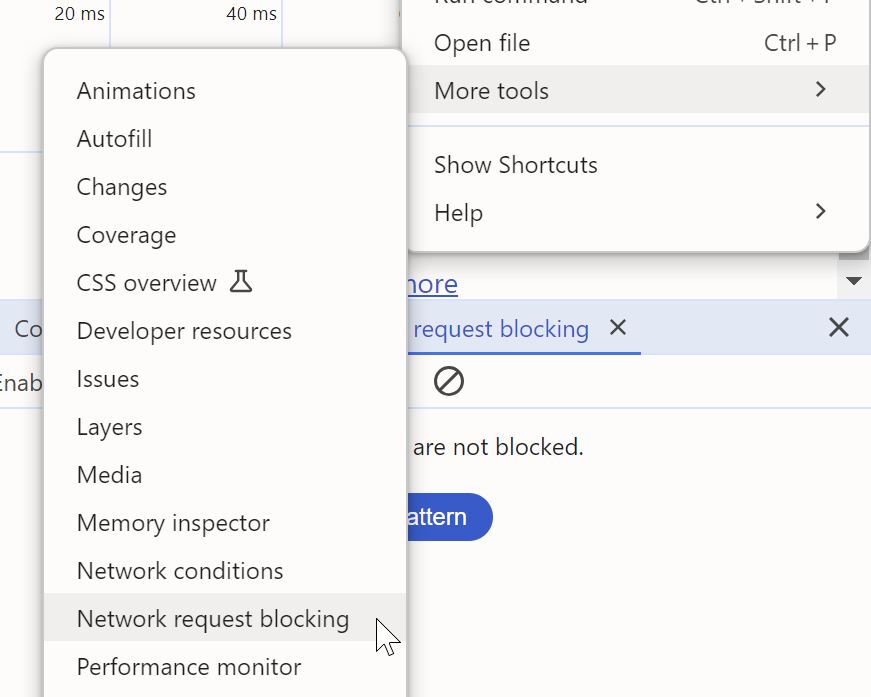
To unblock the request URL, you bring up Network request blocking tool from the "More tools" section in the dev tools settings (cog icon at the top), and delete the request URL from there.
Now I can switch to CSS to do some styling. I'm intentionally breaking the HTML → CSS → JavaScript workflow here because, in this case, it's easier to test with a live page.
I need to do some fixes to the layout of the summary section as the layout
is now a little wonky when the icon is introduced. Therefore in index.css
I need to add this:
.weather-tiles dd {
   display: flex;
   align-items: center;
   gap: 0.2em;
}
Also a few more fixes that are more specific to the summary section in
weather-summary.css:
x-weather-summary :is(.current-temperature dd > span, .wind-direction) {
   display: flex;
   align-items: center;
   gap: 0.2em;
}
Finally, I can add the styling for the new .no-value element:
x-weather-summary .no-value {
display: inline-flex;
justify-content: center;
align-items: center;
width: 1em;
height: 1em;
}
x-weather-summary .no-value::before {
content: '';
display: inline-block;
width: 1em;
height: 0.1em;
background: currentcolor;
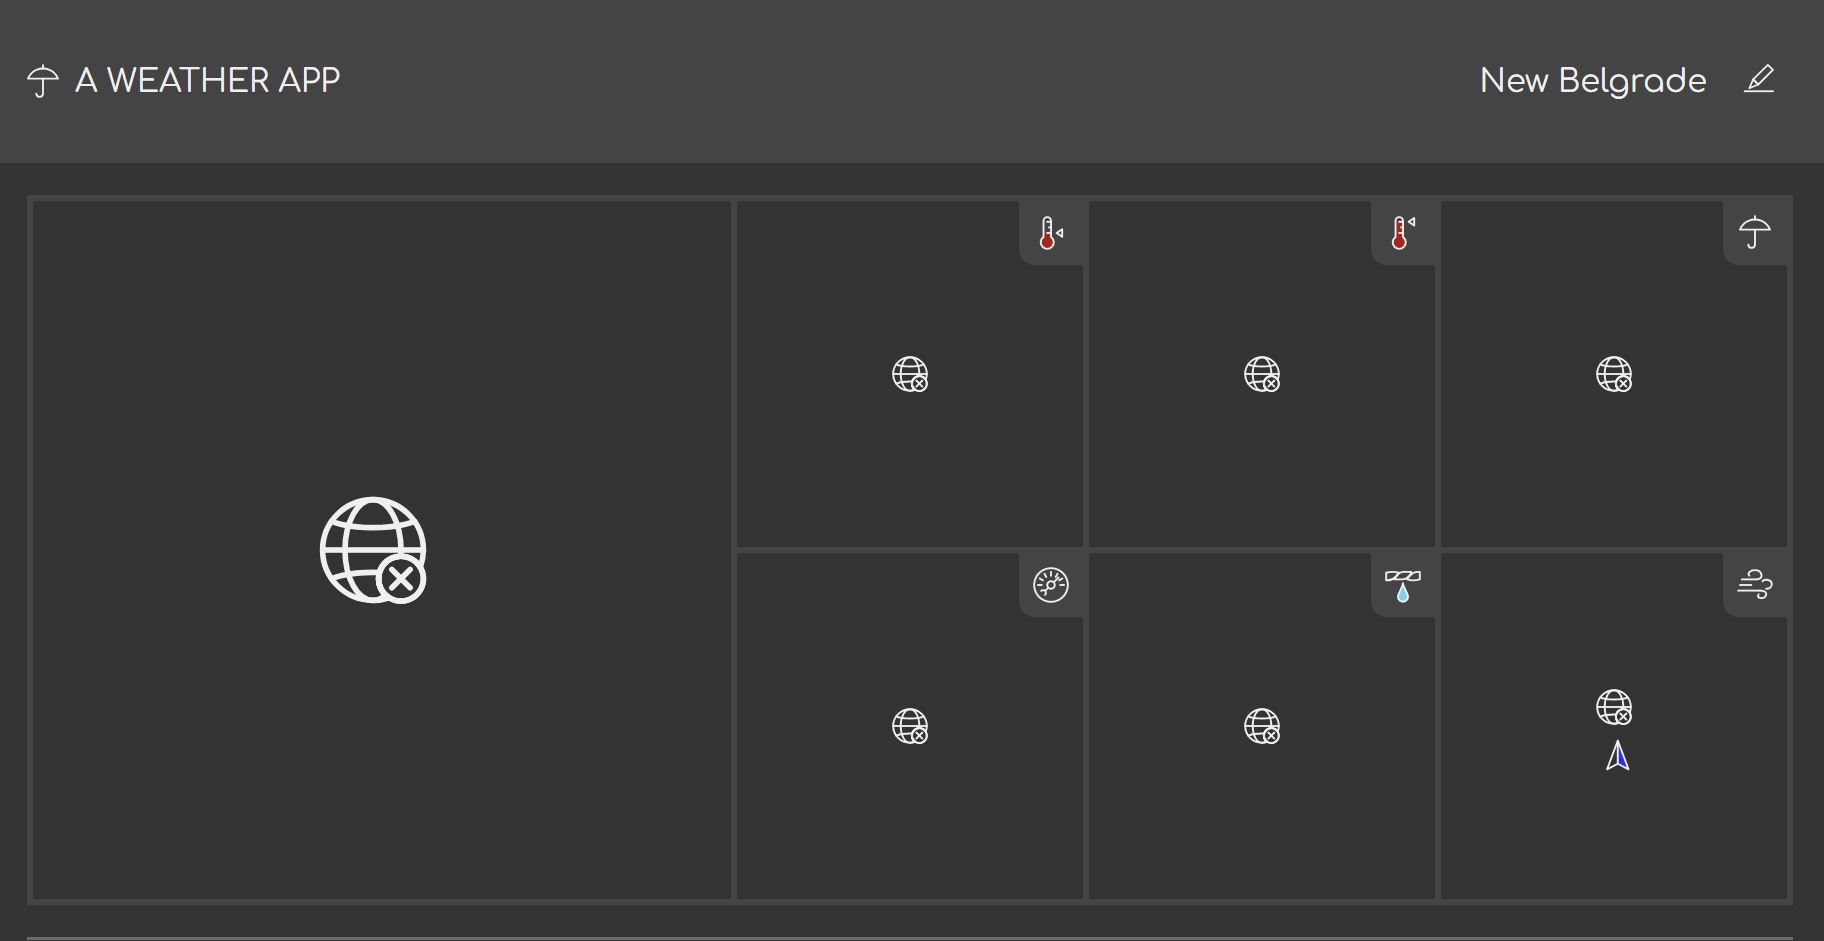
}The result, when network is blocked looks like this:
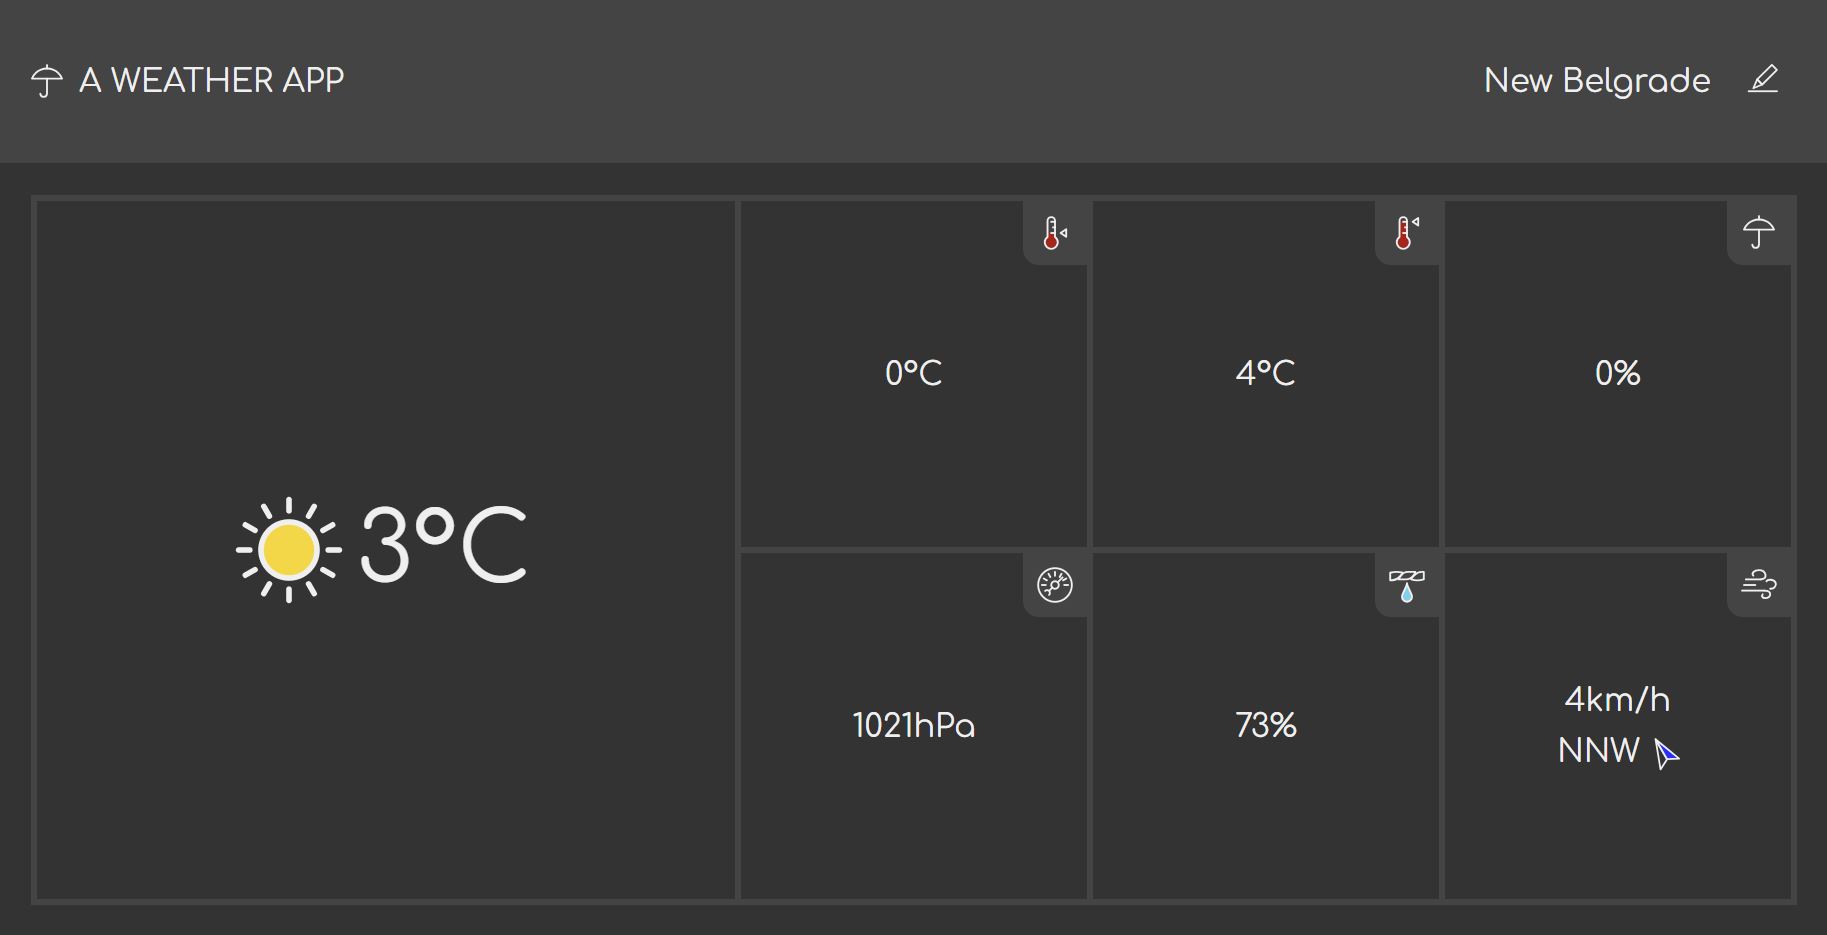
When the network block is lifted, the interface correctly loads the current weather values.
Splitting the changes into commits
I'm done with the code so it's time to commit it.
I have some changes that need to be propagated immediately to other team
members. For example the change to the <x-icon> to support name attribute
change is universally useful. That definitely goes into a separate commit that
can be cherry picked into the master branch.
- A new icon, while not always needed everywhere, is something I'd push to get merged as soon as possible. The conflicts in SVG spritesheets can be tricky to resolve.
- Also, the fix to the weather tile layout is something that should be propagated to the others working on the same page.
- Finally, we have the commit that contains the changes relevant to this branch.
I'm going to group the changes into these three commits, so that individual commits can be cherry-picked by the rest of the team.
Conclusion
In this part, I've split the weather information page into the page proper, and two separate units that encapsulate the functionalities related to the two big sections: weather summary, and weather forecast. I've also implemented a loader that loads these units into correct locations after the page loads – a strategy called lazy-loading. Finally, I've implemented one of the units.
I've done all that in order to show one approach to splitting the single page into multiple independent units without using any build tools. Naturally, this has its limits, and for the trickiest situations, you will probably have an easier time having a light-weight build process.
In the next part, I'll implement the other unit, and we'll then see how smoothly merging these changes go. Once I'm done with both units, I'm going to roll the code back, and implement it as a single monolithic page so that we can see the differences.